
Keys to the Kingdom- Considering a Modification to My Royal QDL. Good or Bad Idea?
Now, I'm not here to discuss keychoppers. Much like lawyers and Real Estate agents, keychoppers are sometimes a necessary evil, especially if one is looking to replace a set of typewriter keys.
It would be the same if I had a 1967 Ford Mustang Fastback...

picture courtesy of http://mustang-ford.eu/ford_mustang_1967
...and I needed to replace a quarter-light window on the passenger-side door. If there was somebody out there junking one of these cars (the madman!) and selling off its parts, then I would deal with them.
Besides, with these keytops, I was planning to resurrect a typewriter, so if I can prevent a set of keys from becoming a pair of cuff-links or one of those stupid bracelets that don't spell out anything intelligible, then that's exactly what I was gonna do.
The seller that I bought the keytops from was selling just the already-removed keys.
And please don't give me the elephant tusk/typewriter keytop analogy. While one is an industrial engineering marvel that revolutionised office productivity and literary output throughout the 20th Century, the other is a living, breathing creature that looks like nothing else on Earth.
And so, to quote a line from a character played by the Patron Saint of Typewriters, Our Man In Hollywood, Mr. Tom Hanks, "and that's all I have to say about that."
Damn, I said I wasn't gonna discuss keychoppers.
Anyway, back on topic, looking at the keybank showed that most of them had faded (The picture below is AFTER I replaced the keytop. Thought I took a BEFORE photo, but there you go).

The only ones that appear the most legible are the D, C, V, 6, 8, and 9 keys.
I'm no expert, but I suspect that there may have been some water-entry under the glass (plastic, maybe) keytops at some point, causing discolouration. I decided to tackle the faded letter 'U' key first.
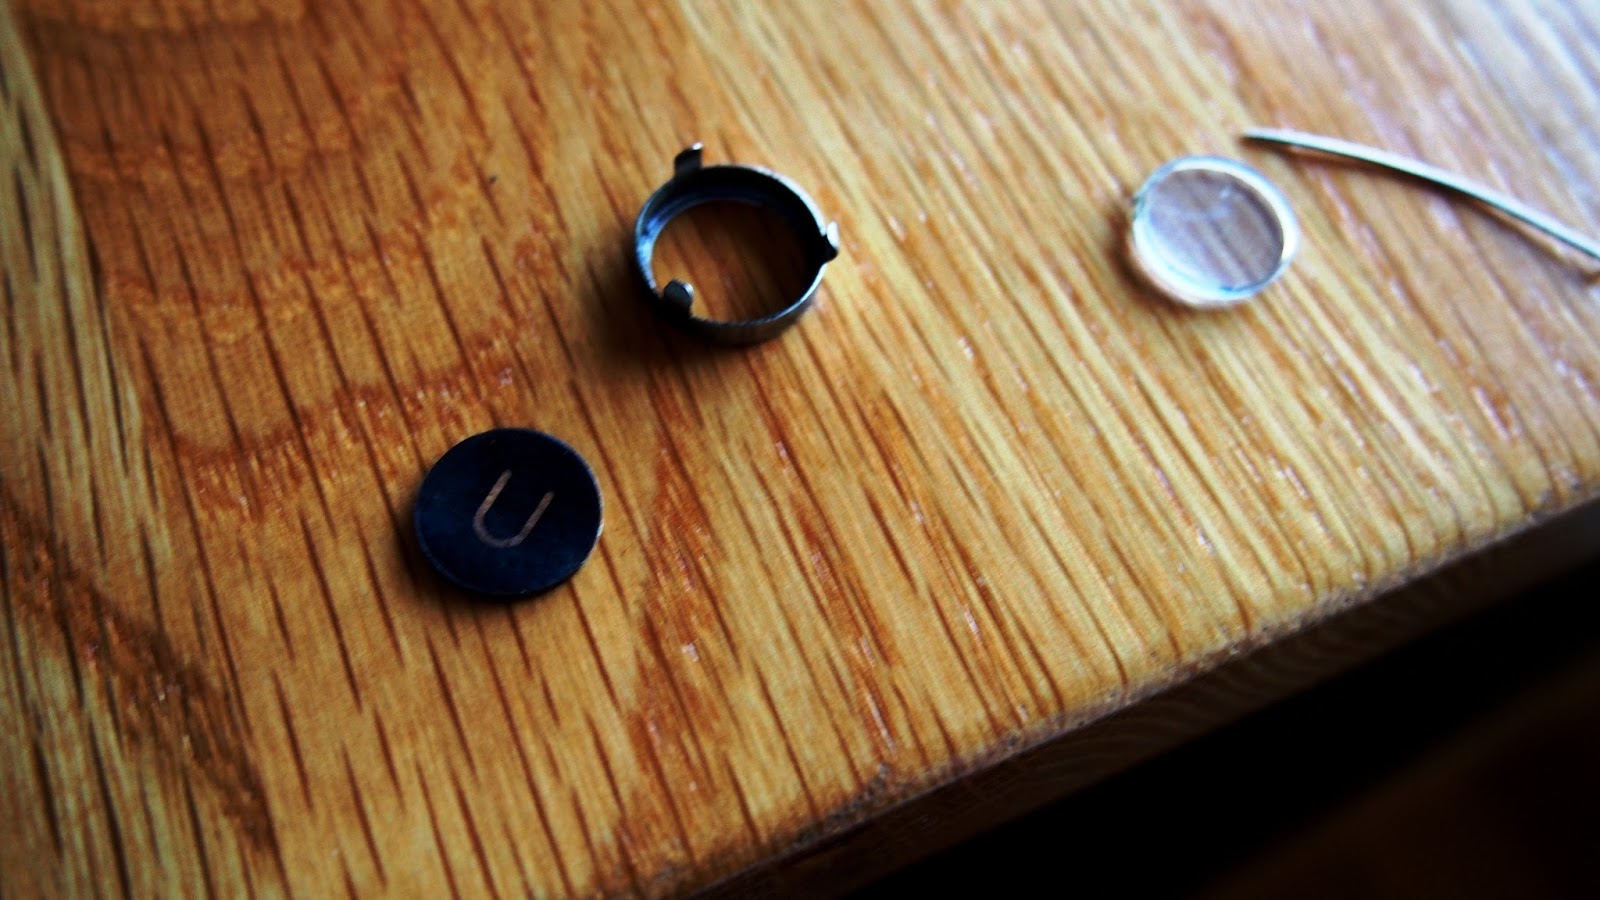
Using the knife of a Leatherman Wave tool, I prised the metal prongs back off the key and very gently lifted the metal ring away from the keytop arm. So far, so good.
The next part would prove to be trickier. How to remove the card insert from the keytop recess. It was nestled in there since the 1940s, so I figured it was not gonna come out without a fight. My weapon of choice? A pin from a sewing kit. The idea was to push it down the side of the keytop recess and lever it out. Of course, what I hadn't figured on was the fragility of a 66 year old piece of water-damaged cardboard. My first attempt lifted a section of paper away from the card insert. Rather than curse, I figured a light dab with a Texta (Magic Marker- by the way, which of those two names is sillier?) would cover up any mishaps once the glass cover was put back in place.
And this is what I ended up with;
The card insert was definitely faded. Turning it over revealed...

...that perhaps it had had some water damage at one time. While I had the ring off, I grabbed hold of some stainless steel polish and gave the ring a rubdown. This will probably be the more time-consuming job in the long run.
Looking at the ring, I felt that I could probably bend the prongs a few times before they snap off completely. However, if I do it right, I'll only need to bend them open and closed once.

Here's the keytop recess with the card insert removed. I was thinking of a dab of glue to hold the replacement insert in place, but decided against it in case it caused a different kind of discolouration in the years to come. Besides, I reasoned that the metal ring and glass top would hold the insert firmly in place once all was said and done. Please excuse the blurry photo;

Looking at the two letter 'U' inserts, you can perhaps see that the replacement on the left is in better condition than the removed one on the right. A quick touch-up with the Texta to cover up the small tear on one edge of the card and it was ready to be fitted into the keytop recess. For this, I used a pair of tweezers and took my time lining it up so that it sat upright and straight in the recess;

I used a pair of flat-nosed pliers to bend the prongs on the rings back into place. Not a 100% perfect job with one prong (slightly visible along the bottom edge of the key), but it's all secure and back in place;

Okay, one down, thirty-nine to go!
Having these keytops also means that I have some spares handy in case the steel does snap off and I can also replace the glass tops that are scratched and chipped.
Hopefully, this Royal with look as good as it types by the time I'm done with it.
Thanks for reading, all!
The metal ring and glass does hold it very well. It is a LOT of work. How soon are you intending to finish the job? I still have John's removal tool.
ReplyDeleteHey, Scott, I'm not in a huge rush with this. I thought I'd tackle one key at a time, so it could take me a few months whenever I have a spare 30-45 minutes and the lighting's good. Thanks for the offer, though. Much appreciated!
DeleteBy the way, if those rings are nickel and not chrome, soak them in a class of coke overnight. The corrosion will simply wipe off.
ReplyDelete.... Just don't do it to chrome, as the coke eats off the chrome.
ReplyDeleteA good start! That's going to look great when you finish.
ReplyDeletePainstaking work but it's looking good.
ReplyDeleteFor chutzpah alone, you get an "A."
I'm all for using the parts of an otherwise dead machine to keep another one running, be it a 1967 Mustang (or a 1968 Falcon!) or a typewriter. And if you keep the keys from finding their way to the missus' ears, that's definitely a bonus! Kudos for that!
ReplyDeleteAlso thank you for showing how the beautiful glasstop keys are put together; I always thought they were enameled and then covered with the glass, never thought they could be printed on cardboard. This opens up a bunch of possibilities, though; it shouldn't be too difficult to reproduce the inlays with modern inks and plastified cardboard for better resistance to moisture. We'd only need to know the diameter of the keys.
When I had my Remington 12 refurbished, Mr. Cervantes replaced several of the keys. The originals were covered with celluloid, and my machine obviously belonged to a smoker, because more than one was completely charred. He replaced them with some nice inlays, bright green with the letter in white. I wish he changed the whole keyboard to those colors; but seeing your post, maybe, just maybe... I could be tempted to make my own inlays and replace them myself.
Miguel, have a look at my other post that I linked in this one. It shows my initial attempts at making my own card inserts. The only reason I haven't gone ahead with it further is because I don't know if I want to have a QDL with buff yellow keytops. I DID think about approaching a printer with the dimensions required, but then this begins to get more time-consuming and expensive than I would prefer.
DeleteI was thinking more along the lines of starting a little "Frankentyper" project, mixing the new and old technologies: a custom-made set of inserts created in the computer using any open-source software, printed on photo paper, and then cut to size with scissors and a steady hand. Then it would be a matter of taking the tool of choice and perform the same surgery you're showing here.
DeleteAs a matter of fact, this inspired a new workshop project for my next weekend; just blogged about it here: http://modernidadyobsolescencia.blogspot.mx/2013/08/taller-creando-insertos-de-repuesto.html
In the world of wristwatches, there are two schools of thought regarding "Franken". Some collectors don't have a problem with it if it means they'll wind up with exactly the watch that they want, using a blend of old and new parts from different models, while others detest this practice of 'creating' something where the serial number will not match the case reference number, etc. I would imagine it might be the same with typewriters. However, if you use a mixture of parts to create a truly unique machine, then I say go for it.
DeleteThis will be one incredibly rewarding project once complete! Even doing one key per day and it's only just over one month.... And material for a blog post I'd love to read: "One long month with a QDL". You could drink the coke that you use each day to get the corrosion off and call it "One long sleepless month with a QDL"... Gee I'm full of good ideas (not).
ReplyDeleteI'm reminded of a certain Johnny Cash song...
ReplyDelete"I Walk The Line"?
ReplyDeleteOr better yet;
"What, did he write a song about changing the keytops on a Royal QDL?"
Just kidding. I got a lot of respect for The Man in Black.
how would the A key for my Royal QDL because it broke got any suggests
ReplyDeleteHuh?
DeleteI will be taking possession of a 1938 KMM for $90 that is a perfectly fine typewriter except for the fact that ALL The keys, even the two on the front facing are about 98% faded. I don't have any of the spare keys to do this myself, so I am H O P I N G the typewriter repair place near me will take on this task, because the one I bought it from all but refused to do the work. The typewriter was about $200 when the place was first trying to sell it, but had to knock off $110 because noone was willing to buy it. I have a suspicion it was specifically that, even in real good lighting, it is all but IMPOSSIBLE to read the keys.
ReplyDeleteOk. I now have the tools (a set of two different pliers, one popper, one crimper) to remove and replace the metal rings, so I can replace the inserts in my Royal KMM 1939. What I am looking for are the inserts, or, at least, some kind of template in existence, that I can use. Do you know of any?
ReplyDeleteDoes it have round keys? I could scan the three templates that I created. Only problem is that they are black letters printed on buff yellow card-stock. I included a small picture of them in my other post about my keytop removal attempt, which is linked to in this post you are reading. I'm tempted to change them myself, but I don't know if light coloured keytops would bother me or not.
DeleteWould certainly make a change, though.